How To Draw a Rose
There’s something timeless about drawing a rose. It looks elegant, feels rewarding to sketch, and somehow makes you look way more artistic than you actually need to be. The good news? You don’t need years of experience to create a beautiful rose drawing.
I remember avoiding roses because I thought they looked impossibly complicated. Then I learned one simple trick: build the flower from the center outward. Suddenly everything clicked. If you’ve ever stared at a blank page wondering where to start, you’re in the right place.
In this tutorial, I’ll show you how to draw a rose step by step using eight beginner-friendly stages. Grab a pencil, some paper, and let’s get started!
Why Start with Simple Rose Shapes?
Many beginners jump straight into drawing individual petals. That usually ends with uneven flowers and plenty of eraser dust. Ask me how I know.
Instead, this tutorial uses a simple construction method. You begin with a guide circle and slowly build each layer of petals. Every step adds just a little more detail, so the drawing never feels overwhelming.
By following this approach, you’ll learn how to:
- Sketch a balanced rose shape
- Create realistic-looking layered petals
- Add a natural stem and leaf
- Finish your drawing with beautiful color
The best part? Once you master this rose, you can draw larger bouquets, floral wreaths, or greeting card illustrations with confidence.
Drawing Supplies You’ll Need
You don’t need fancy art supplies for this project. Simple tools work perfectly.
Here’s what I recommend:
- Pencil (HB or 2B)
- Eraser
- Black fineliner or marker
- White drawing paper
- Colored pencils, crayons, or markers
FYI: I usually sketch lightly with an HB pencil first. That makes corrections much easier before outlining.
How To Draw a Rose Step by Step
Follow these eight simple steps using the reference image.
Step 1. Draw a Large Circle Guide

Everything starts with a simple circle.
Draw a large, light circle near the center of your page. This isn’t part of the final flower, so keep the lines soft. The guide helps you keep every petal evenly spaced.
Don’t worry if your circle isn’t perfect. Roses certainly don’t carry rulers around.
Tip: Keep the circle large enough to leave room for several layers of petals.
Step 2. Draw the Center of the Rose

Now draw a smaller circle inside the guide.
Place it roughly in the middle, leaving equal space around all sides. This smaller circle marks the tightly folded center of the rose.
Keeping this circle centered helps the flower look balanced later.
Remember: Draw lightly since you’ll build over these shapes.
Step 3. Add the First Curved Petal

Here’s where the rose starts coming to life.
Draw one smooth curved line wrapping around the small center circle. Think of it as the first petal gently hugging the middle of the flower.
Use flowing lines instead of stiff curves. Roses have soft, organic shapes.
Ever notice how flowers rarely look perfectly symmetrical? That’s exactly why slightly uneven curves actually improve your drawing.
Step 4. Build the Inner Rose Petals

Now continue adding petals around the center.
Draw several overlapping curved shapes that spiral outward. Each petal should overlap the previous one while gradually increasing in size.
Take your time here because the layered petals create the classic rose appearance.
A few helpful tips:
- Keep each petal slightly different.
- Let petals overlap naturally.
- Use smooth curves instead of sharp corners.
- Slowly spiral outward.
IMO, this is the most satisfying step because the flower suddenly becomes recognizable.
Step 5. Draw the Outer Petals
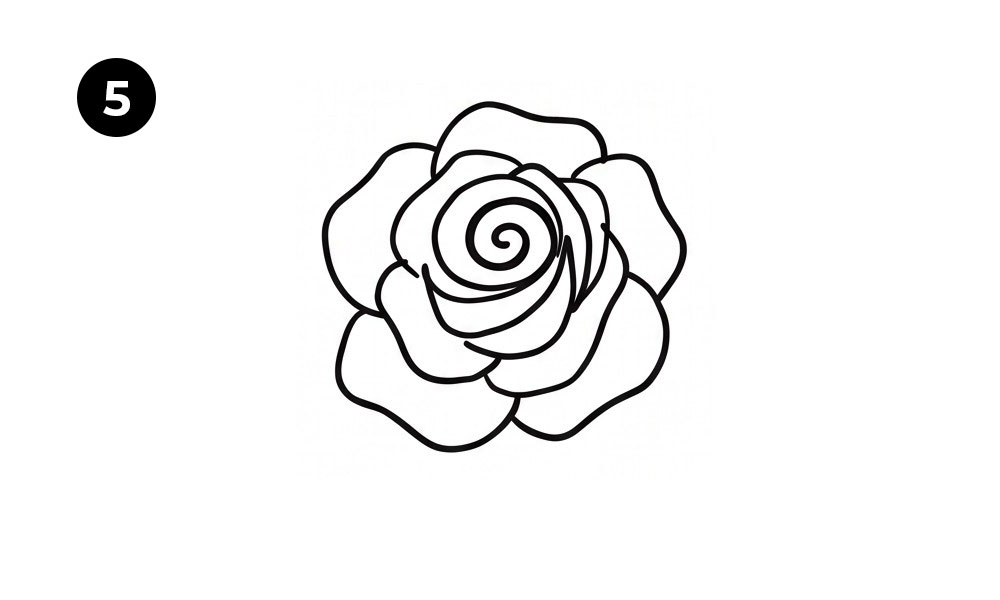
Once the center feels complete, add the larger outside petals.
These petals open wider and create the full bloom. Draw wavy edges instead of perfectly rounded shapes to make the rose feel more natural.
Don’t try to make every petal identical.
Nature loves variety, and your drawing should too.
If one petal ends up a little larger than another, congratulations—you’ve accidentally made it look more realistic.
Step 6. Add the Stem
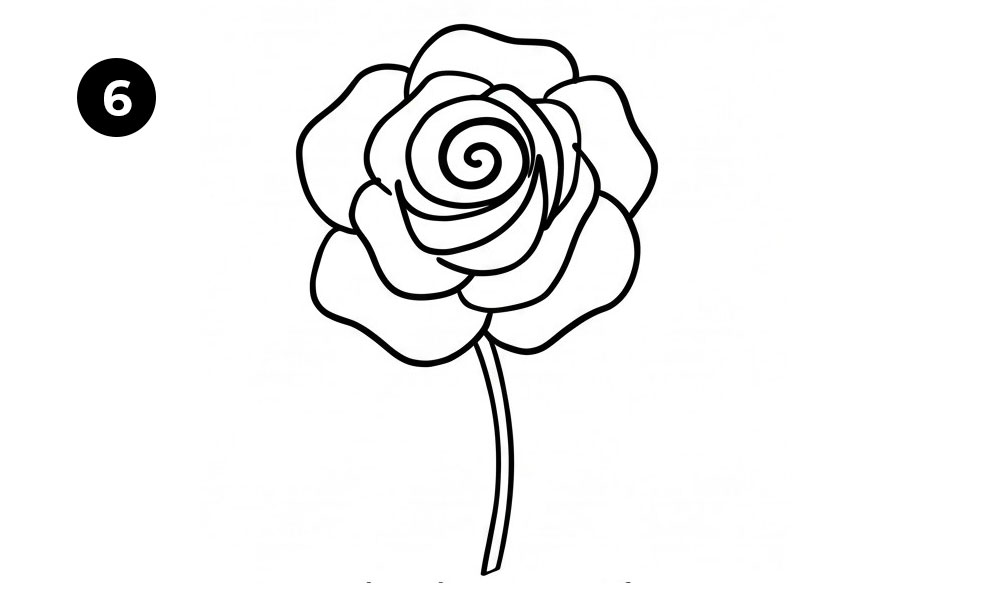
Now it’s time to support your flower.
Draw two gently curved lines extending downward from the base of the rose. Keep the stem fairly thin with a slight curve instead of making it perfectly straight.
A subtle bend gives the flower a softer, more natural appearance.
You can erase any unnecessary guide lines before moving on.
Step 7. Draw the Leaf and Final Details
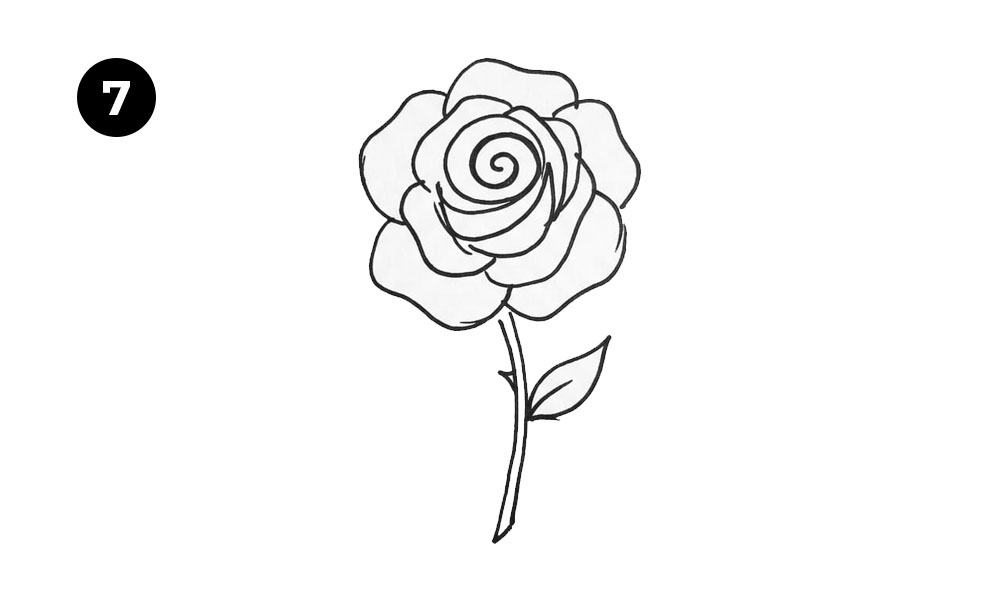
Your rose already looks great, but a few finishing touches make a huge difference.
Add a single leaf growing from one side of the stem. Draw the basic leaf shape first, then include the center vein and a few smaller veins.
Now refine the flower by:
- Cleaning up overlapping lines
- Smoothing rough edges
- Strengthening important outlines
- Erasing remaining guide circles
These little adjustments make the drawing feel polished.
Step 8. Color Your Rose
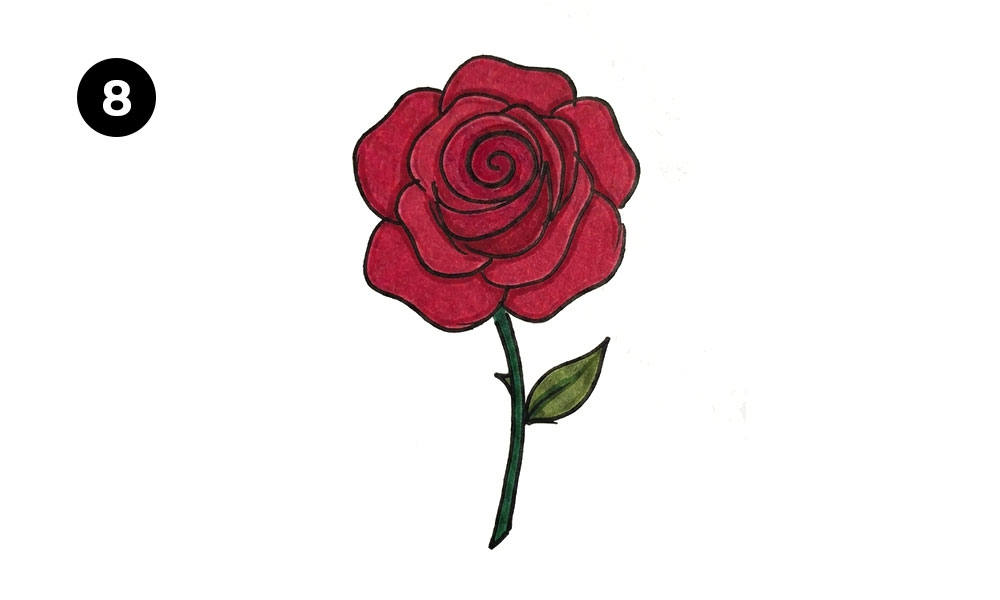
This is my favorite part.
Color the petals with shades of red, pink, yellow, white, or even orange if you want something unique. Use darker tones near the petal folds and lighter shades along the edges to create depth.
For the stem and leaf:
- Color the stem dark green.
- Use lighter green highlights on the leaf.
- Add darker shadows near the veins.
Even simple coloring makes the rose pop off the page.
Tips for Making Your Rose Look Better
Want your flower to stand out even more?
These simple tricks make a noticeable difference.
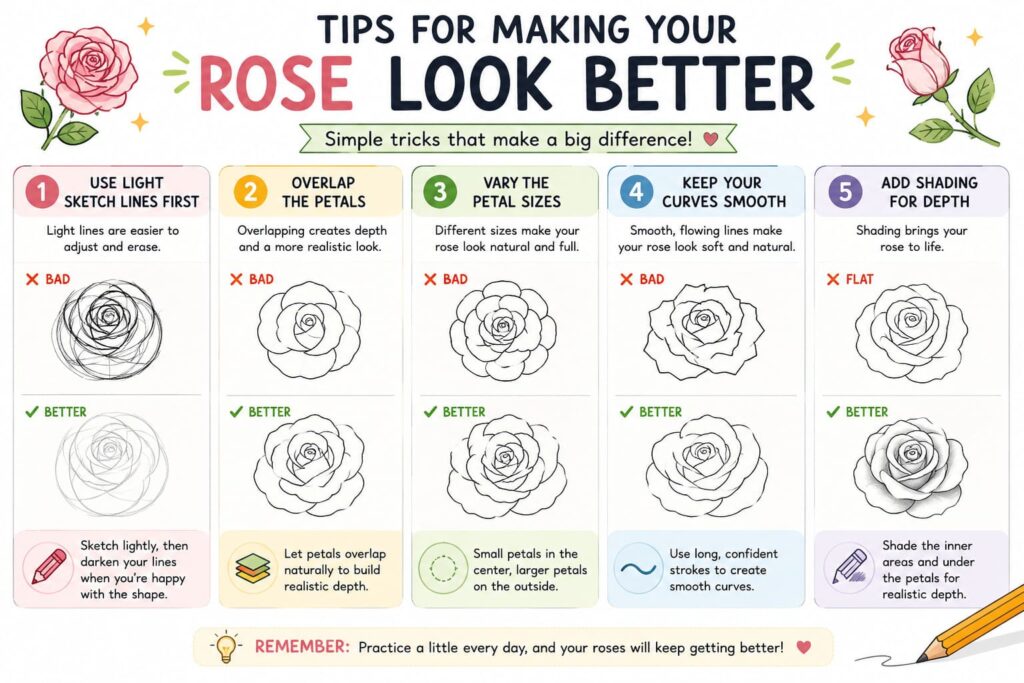
Use Light Sketch Lines First
Sketch lightly before outlining.
Light construction lines allow you to fix mistakes without damaging the paper. I almost always redraw a petal or two before adding ink.
Trust me—it saves a lot of frustration.
Overlap the Petals
Real roses contain layers upon layers of petals.
Avoid drawing every petal separately. Instead, let each one overlap the next to create depth and realism.
The more natural the overlap looks, the more convincing the flower becomes.
Vary the Petal Sizes
Small petals belong near the center.
Larger petals belong around the outside.
This gradual size increase creates the blooming effect that makes roses so recognizable.
Keep Your Curves Smooth
Sharp angles make flowers look stiff.
Instead, draw long, flowing curves with confident strokes. Even if your lines aren’t perfect, they’ll usually look more natural than hesitant ones.
Common Mistakes Beginners Make
Everyone makes mistakes while learning. I certainly did.
Here are the most common ones to avoid.
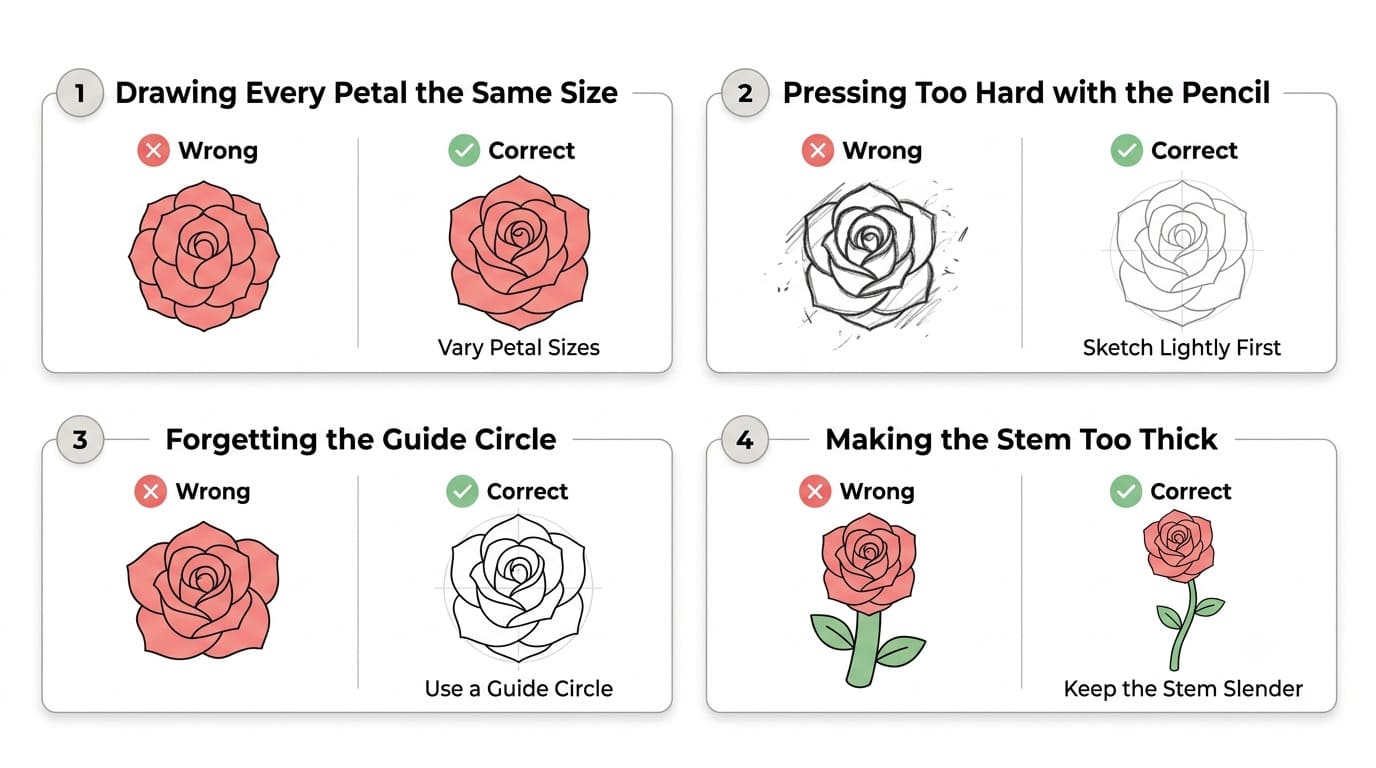
Drawing Every Petal the Same Size
Uniform petals make the rose look flat.
Instead, gradually increase the petal size as you move outward.
Pressing Too Hard with the Pencil
Heavy sketch lines become difficult to erase.
Keep your pencil pressure light until you’re completely happy with the drawing.
Forgetting the Guide Circle
The guide circle keeps everything balanced.
Skipping it often leads to uneven flowers with crowded petals on one side.
A simple circle saves plenty of headaches later.
Making the Stem Too Thick
A giant stem can overpower the flower.
Keep it slender and gently curved for a more elegant look.
Fun Ways to Customize Your Rose
Once you’ve mastered the basic version, try adding your own style.
Here are a few fun ideas:
- Draw a bouquet of roses
- Add rose buds beside the flower
- Create leaves on both sides
- Draw water droplets on the petals
- Add butterflies or bees nearby
- Use rainbow colors instead of traditional red
- Turn the rose into a greeting card design
Ever wondered how artists develop their own style? They simply keep experimenting.
Why Practice Roses?
You might ask, “Why spend time drawing roses?”
Because roses teach several important drawing skills at once.
You’ll practice:
- Layering shapes
- Creating smooth curves
- Building depth
- Improving hand control
- Understanding natural forms
Those skills transfer to almost every flower you’ll draw later.
One rose today often leads to sunflowers, daisies, tulips, and entire floral gardens tomorrow.
Final Thoughts
Learning how to draw a rose doesn’t have to feel intimidating. By starting with a simple guide circle and adding petals one layer at a time, you can create a flower that looks surprisingly elegant without making the process complicated.
Remember the eight steps: draw the guide, create the center, add the first petal, build the inner petals, draw the outer petals, add the stem, finish with the leaf, and color your rose. Practice each stage a few times, and you’ll notice steady improvement with every sketch.
So grab your pencil, give this tutorial a try, and don’t stress over tiny imperfections. Every rose you draw teaches you something new—and honestly, even the slightly wonky ones have their own charm. Happy drawing! 🌹