How To Draw a Seaplane: A Simple Step-by-Step Guide
Want to learn how to draw a seaplane without getting tangled in complicated shapes? Grab a pencil and let’s keep things simple. A seaplane might look tricky at first, but once you break it into a few basic shapes, the whole drawing starts to make sense.
I’ve always liked drawing aircraft because small details can make a huge difference. With a seaplane, you get wings, a propeller, a cabin, and those chunky floats underneath. Basically, you get plenty of fun details without needing an engineering degree. 🙂
In this guide, I’ll walk you through six easy steps to draw a seaplane. You can follow along with a pencil, eraser, and paper, then add your favorite colors at the end.
What You Need to Draw a Seaplane
Before we start, gather a few basic drawing supplies. You don’t need anything fancy for this tutorial.
Here’s what I recommend:
- Pencil for your initial sketch
- Eraser for cleaning up construction lines
- Black pen or marker for the final outline
- Colored pencils, crayons, or markers for coloring
- Plain white paper or a sketchbook
If you use digital drawing software, you can follow the same process with a simple brush. The key idea stays the same: start with simple shapes, then build the details gradually.
Why rush into tiny details when you can make the basic structure work first?
Step 1. Draw the Basic Seaplane Outline
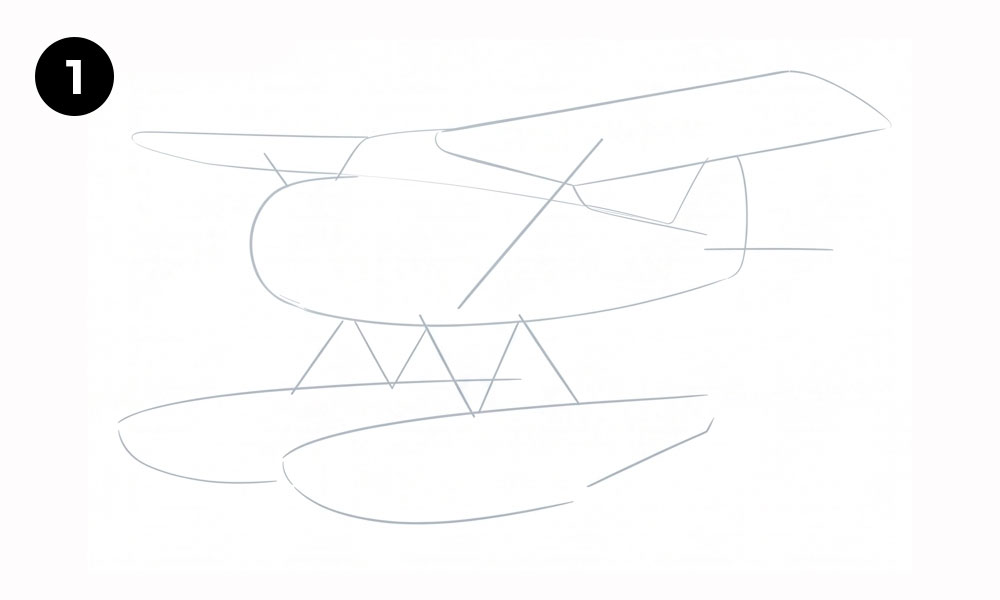
Start your seaplane drawing with a light sketch. Don’t press your pencil too hard because you’ll erase some of these lines later.
Begin with the main fuselage. Draw a long, slightly rounded shape across the center of your page. Keep the front a little larger and rounded because the engine will sit there.
Next, sketch the large upper wing. Draw a long wing extending across the top portion of the aircraft. Keep the wing fairly straight, but give the ends a slight curve to make it look more natural.
Keep the Shape Simple
At this stage, don’t worry about windows, propeller blades, or tiny structural details. Focus on the overall silhouette.
Your first sketch should include:
- The main aircraft body
- The large upper wing
- The basic tail section
- The rough position of the floats
- A few guide lines for the wing supports
Think of this step as building a skeleton for your seaplane. If the proportions look strange now, you can fix them before adding details.
Use light pencil strokes so you can adjust the shape easily.
Ever notice how much easier drawing becomes when you stop trying to make every line perfect immediately? That little trick saves a surprising amount of erasing.
Step 2. Add the Main Body and Floats
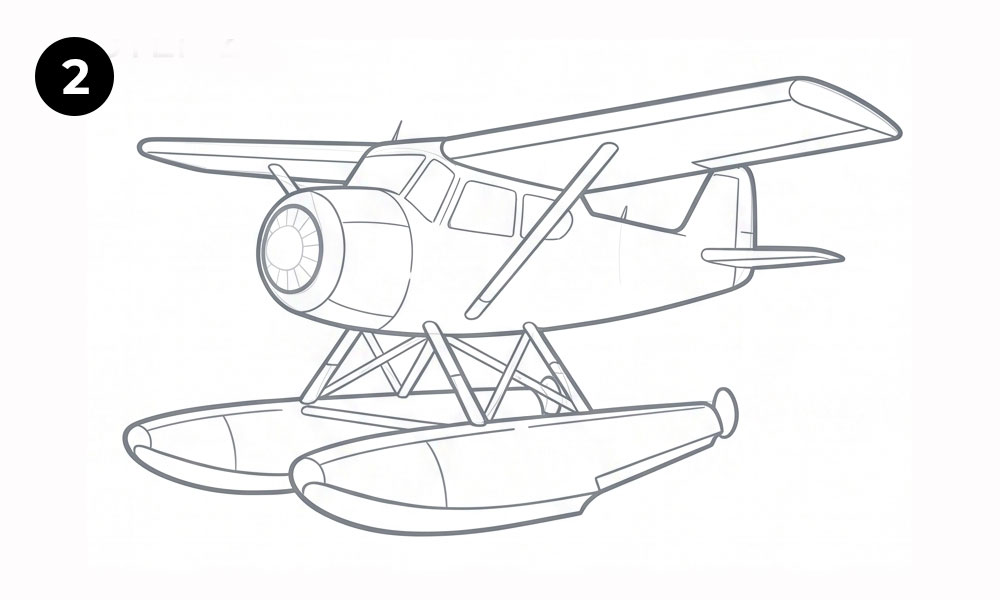
Now let’s give the aircraft some personality.
Refine the main fuselage and add the cabin windows near the front and middle. Draw several rectangular windows with slightly rounded corners. Keep them aligned with the aircraft body so they follow its perspective.
Next, focus on the most recognizable feature of a seaplane: the floats.
Draw the Seaplane Floats
Seaplane floats help the aircraft land and take off from water. In our drawing, they sit underneath the main body and connect to the aircraft with several support struts.
Draw two long, rounded float shapes below the fuselage. Give each float a pointed or curved front and a slightly raised rear section.
Try to keep the two floats similar in size. They don’t need to match perfectly, though. A tiny difference can actually make a hand-drawn illustration feel more natural.
Then add the support structures between the floats and the fuselage.
You can think of these supports as simple diagonal lines forming triangular shapes.
Don’t overcomplicate the supports. A few clean lines will communicate the structure better than a forest of random lines.
Check Your Proportions
Take a quick look at your drawing before moving forward.
Ask yourself:
- Does the fuselage look long enough?
- Does the upper wing look wide enough?
- Do the floats sit evenly underneath?
- Does the cabin sit in the right position?
- Does the aircraft look balanced?
If something feels off, fix it now. Trust me, correcting a basic shape early beats trying to hide it later. Your eraser will thank you.
Step 3. Add the Propeller and Details
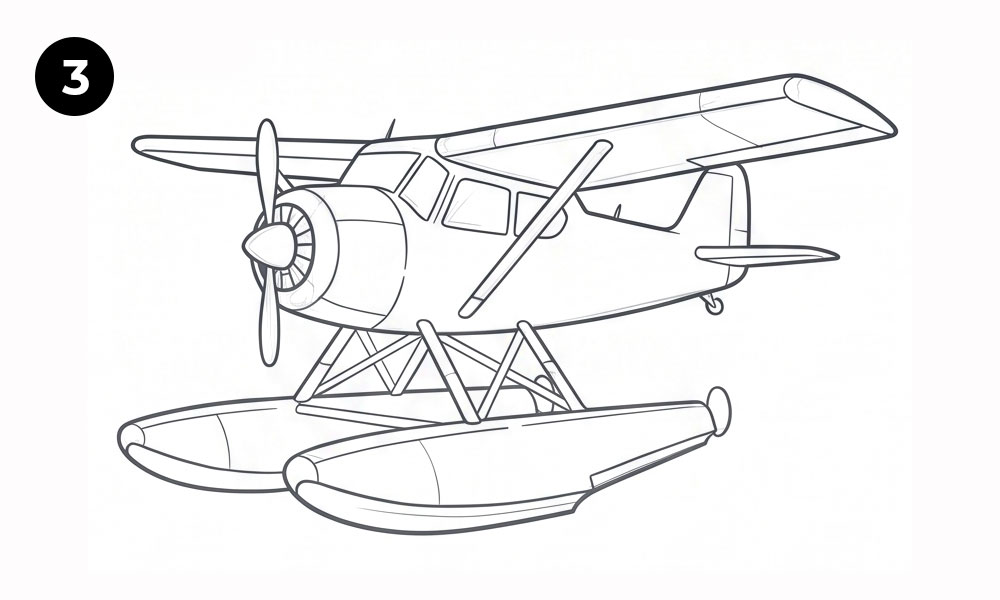
Now comes one of the fun parts: adding the propeller.
Draw the engine housing at the front of the fuselage. Use a rounded cylindrical shape that connects naturally to the aircraft body.
Then draw the propeller in front of the engine.
Draw the Propeller
Keep the propeller blades long and narrow. Add two or more blades depending on the style you want.
For this particular seaplane drawing, the propeller sits vertically. That position gives the aircraft a strong, recognizable silhouette.
Add a circular hub in the center where the blades meet.
Next, add the cockpit windows and side windows. Use simple geometric shapes rather than trying to create complicated reflections.
You can also add:
- Small landing or support details
- Tail fins
- Wing struts
- Engine details
- Small panel lines
- Rudder and tail surfaces
Small details can make a simple aircraft drawing look much more finished.
Add the Wing Supports
Look closely at the connection between the wing and fuselage. Add the diagonal supports that connect these sections.
Then add any remaining supports between the fuselage and floats.
FYI, these lines don’t need perfect symmetry. Focus on keeping them visually balanced.
At this point, your drawing should clearly resemble a seaplane even without color.
Step 4. Refine the Seaplane Outline
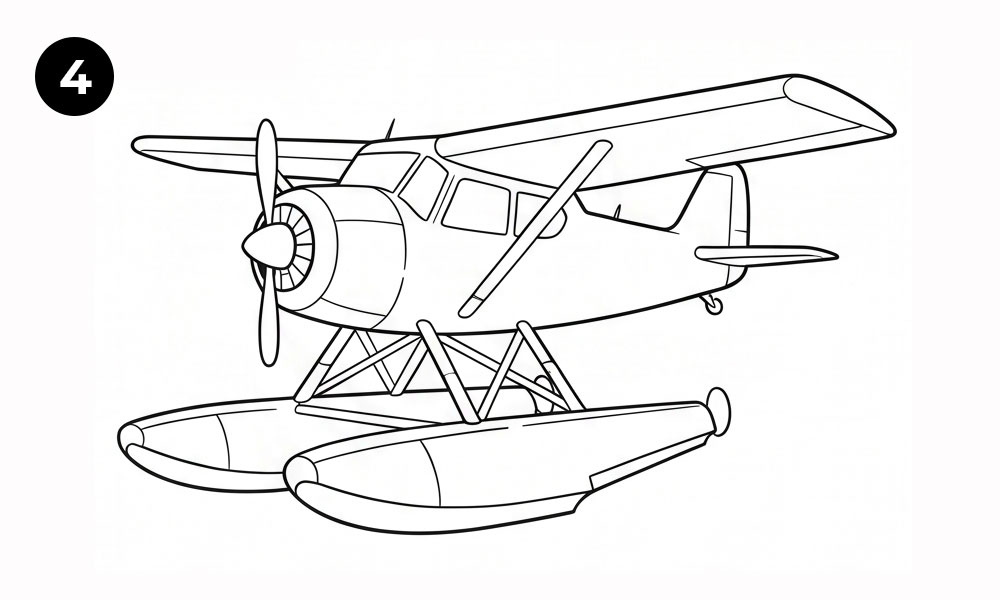
Now let’s clean things up.
Take your time with the outline and look for areas where your initial sketch looks rough. Refine the wing edges, fuselage, floats, tail, and propeller.
This step makes a huge difference because your early construction lines probably look a little messy. That’s completely normal.
Clean Up the Shape
Use your eraser to remove unnecessary guide lines. Keep the important construction lines temporarily if they help you maintain the proportions.
Then refine these areas:
- Wing edges
- Fuselage shape
- Cabin windows
- Propeller blades
- Float contours
- Support struts
- Tail section
Pay special attention to the floats. Their curved shape can make the aircraft look either sleek or awkward depending on how you draw them.
IMO, clean float shapes instantly make a seaplane illustration look more polished.
Add Curves and Small Features
Don’t make every line perfectly straight. Real aircraft contain plenty of curves and changes in direction.
Add subtle curves around the engine housing and floats. Give the wings slightly rounded tips. Refine the tail and rudder so they connect smoothly to the fuselage.
Ever wonder why some simple drawings look professional while others look like quick doodles? Clean contours often make the biggest difference.
You don’t need hundreds of details. You need the right details in the right places.
Step 5. Strengthen the Final Lines
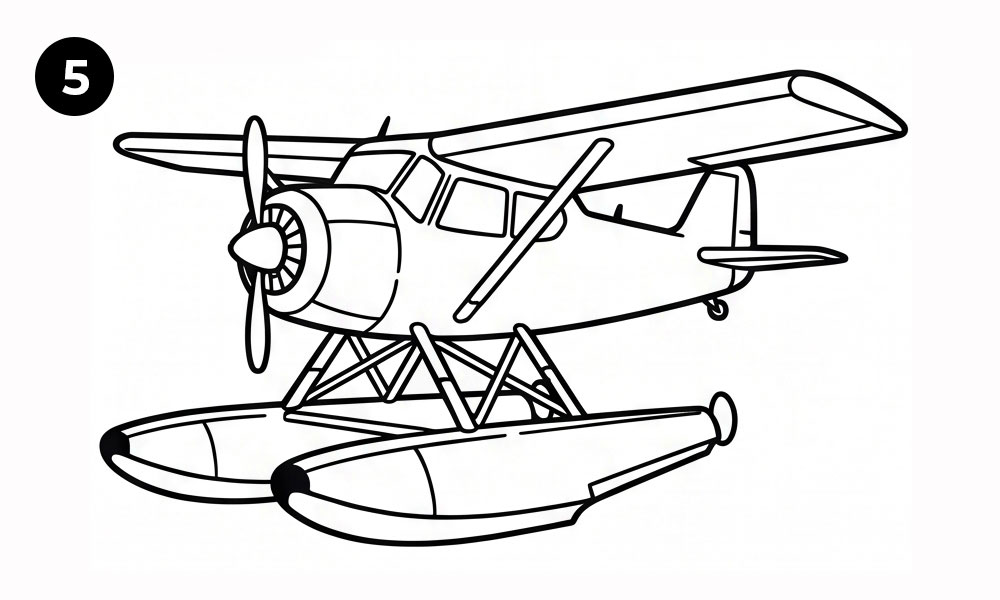
Your drawing should now look pretty good in pencil. Time to make those important lines stand out.
Use a black pen, fine liner, or darker pencil to trace the final outline.
Create a Strong Outer Outline
Start with the main silhouette.
Trace the:
- Upper wing
- Fuselage
- Tail
- Engine
- Propeller
- Floats
- Support structures
Use slightly thicker lines around the outer edges and thinner lines for interior details.
This technique creates a little visual hierarchy. The viewer immediately sees the main shape before noticing the smaller details.
Add Interior Details
After finishing the main outline, reinforce the cabin windows, wing supports, engine details, and float lines.
Avoid outlining every tiny section with the same heavy pressure. Too many thick lines can make the drawing look crowded.
If you make a mistake, don’t panic. Your seaplane hasn’t crashed; your pencil simply took a creative detour. :/
Once the ink or darker pencil settles, erase any remaining light construction lines.
Now you have a clean seaplane line drawing ready for color.
Step 6. Color Your Seaplane
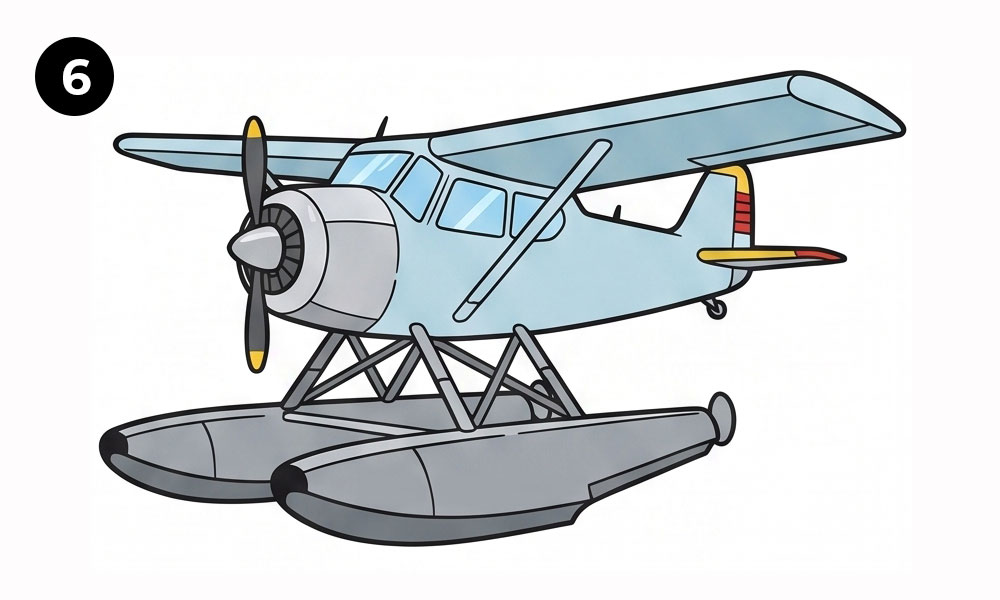
Here comes the part where you can have some fun.
The reference design uses a light blue aircraft body with darker gray floats. You can follow that color scheme or create your own.
Choose Your Main Colors
For a classic seaplane look, try:
- Light blue for the fuselage and wings
- Gray for the floats
- Dark gray for the engine
- Yellow for the propeller details
- Red or orange for small tail accents
- Light blue or pale gray for the windows
You don’t have to follow realistic aircraft colors. Maybe you want a bright yellow seaplane. Maybe you want a red one. Why not?
Add Color Gradually
Start with the largest areas first.
Color the fuselage and wings with your main shade. Then move to the floats, engine, propeller, and smaller details.
Try to keep your strokes consistent. If you use colored pencils, build the color gradually instead of pressing extremely hard from the beginning.
For extra depth, add a slightly darker shade underneath the wings and around the lower parts of the fuselage.
Simple shading can make your seaplane look three-dimensional.
You can also add a little darker color around the float edges to make their rounded shapes stand out.
Easy Tips for a Better Seaplane Drawing
Once you understand how to draw a seaplane step by step, you can experiment with different designs.
Here are a few quick tips that can help:
1. Start Light
Always begin your construction sketch with light lines. You’ll make plenty of adjustments as you go.
2. Use Simple Shapes
Break complicated sections into basic forms.
Think:
- Ovals for the engine
- Rectangles for windows
- Long curves for floats
- Triangles for support structures
- Long shapes for wings
This approach makes the drawing much easier for beginners.
3. Watch the Perspective
Keep the wing, fuselage, and floats aligned with the same perspective.
If one section suddenly points in a completely different direction, the aircraft can look distorted.
4. Don’t Overload the Drawing
More details don’t always mean a better drawing.
A clean outline with a few well-placed details often looks better than an overloaded sketch.
5. Experiment With Colors
Try different color combinations after you finish your basic drawing.
You could create:
- A classic blue-and-gray seaplane
- A bright yellow seaplane
- A vintage red-and-cream aircraft
- A modern white-and-blue design
- A completely imaginary color scheme
Who says your seaplane needs to follow the rulebook?
Common Mistakes When Drawing a Seaplane
Even simple aircraft drawings can create a few headaches. Luckily, most problems have easy solutions.
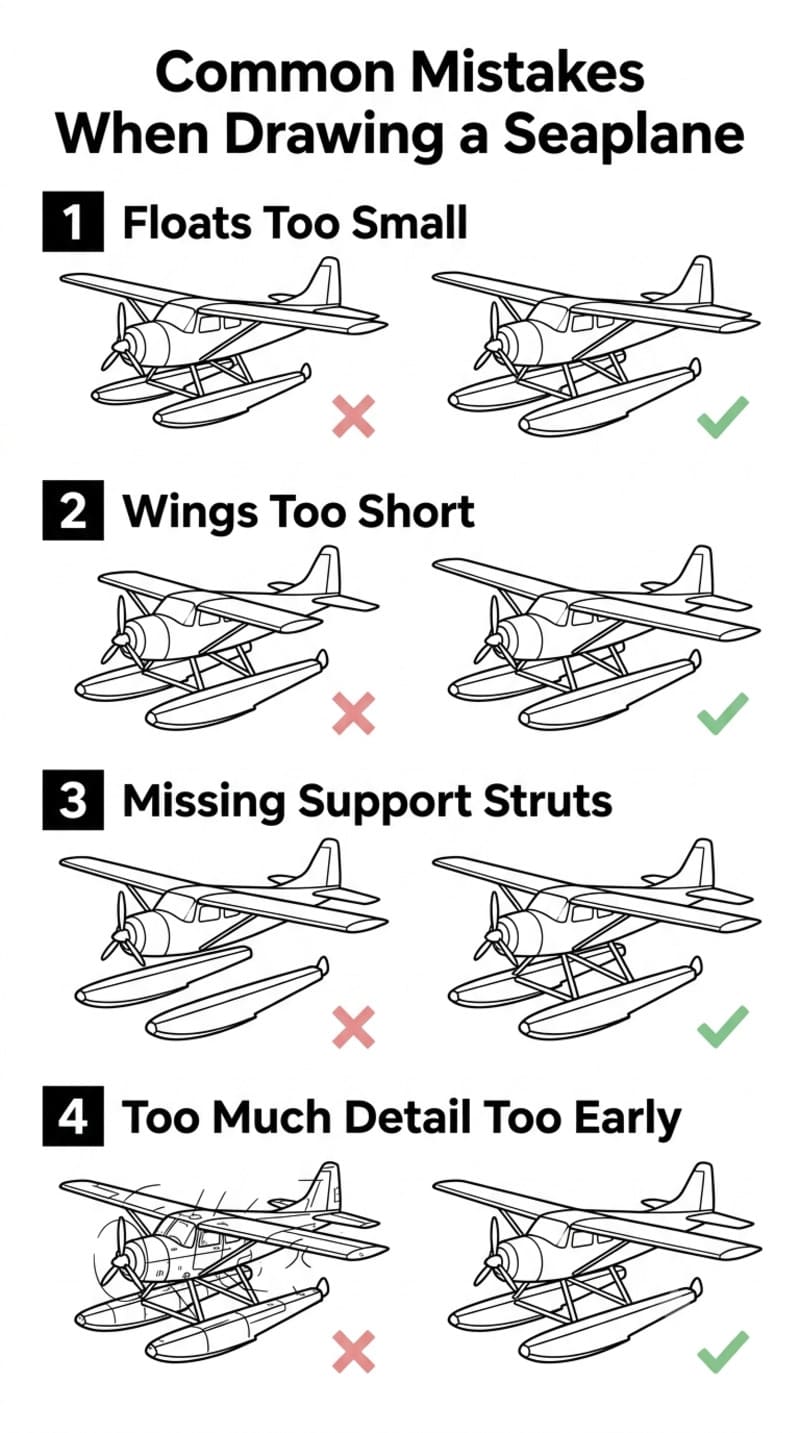
Making the Floats Too Small
The floats should look substantial enough to support the aircraft visually. If you make them too thin or tiny, the seaplane can lose its characteristic appearance.
Making the Wings Too Short
The upper wing plays a major role in the silhouette. Give it enough width to balance the fuselage and floats.
Forgetting the Support Struts
The supports connect the aircraft body to the floats. Without them, the floats can appear to float under the aircraft for no reason—which would be impressive, but probably not what we’re drawing.
Adding Too Much Detail Too Early
Focus on the large shapes first. Details should support the drawing, not distract from it.
Pressing Too Hard With the Pencil
Heavy construction lines can make corrections difficult. Keep your early strokes light and build your final lines later.
How to Practice Your Seaplane Drawing
One drawing can teach you the basics, but repetition helps you improve.
Try drawing the same seaplane several times while changing one element each time.
For example:
- Draw it from a slightly different angle.
- Change the wing shape.
- Try different float designs.
- Experiment with propeller sizes.
- Change the cabin window arrangement.
- Try a different color scheme.
- Add simple clouds or water underneath.
Want an extra challenge? Draw the aircraft from a front, side, or three-quarter view.
The three-quarter view can feel tricky at first, but it teaches you a lot about perspective and proportion.
Why Drawing a Seaplane Makes a Great Beginner Project
A seaplane combines several useful drawing skills in one project.
You practice:
- Basic shapes
- Curved lines
- Perspective
- Symmetry
- Proportion
- Line control
- Simple shading
- Coloring
That makes this tutorial more than just a fun aircraft sketch. It gives you plenty of opportunities to improve your overall drawing skills.
And honestly, aircraft look impressive even when you keep the drawing simple. That makes them great subjects when you want something more interesting than another basic cube or flower.
Final Thoughts on How To Draw a Seaplane
Learning how to draw a seaplane doesn’t require complicated techniques. Start with the basic outline, build the fuselage and floats, add the propeller and smaller features, clean up your lines, and finish with color.
The most important thing? Don’t chase perfection on your first attempt. Your first seaplane might look a little wonky, and that’s perfectly fine. Every new drawing gives you another chance to improve your proportions, lines, and confidence.
So grab your pencil, start with those simple shapes, and give your seaplane some room to take off. Who knows? Your next sketch might look good enough to make you want to draw an entire fleet.