How to Draw a Jeep Convertible Car: A Simple Step-by-Step Guide
Want to learn how to draw a Jeep convertible car without getting tangled in complicated shapes? Good news: you don’t need advanced drawing skills or a garage full of fancy art supplies.
You only need a pencil, a little patience, and a willingness to erase a few lines when your Jeep decides to look more like a box on wheels.
I enjoy drawing vehicles because they let you build something recognizable from a few simple shapes.
A Jeep convertible works especially well for beginners because its boxy body, large wheels, open roof, and bold front grille create clear steps to follow.
In this guide, I’ll walk you through six easy steps to draw a Jeep convertible car. You’ll start with a simple basic shape and gradually add the details that give your drawing its rugged Jeep-style look.
Ready? Grab your pencil, and let’s get started.
What You Need to Draw a Jeep Convertible Car
Before you start your Jeep convertible car drawing, gather a few basic supplies. You don’t need an expensive art kit. In fact, a simple setup often works best.
You can use:
- A pencil for sketching
- An eraser for cleaning up construction lines
- A black pen or marker for outlining
- Colored pencils, crayons, or markers for coloring
- White drawing paper
Start with light pencil lines during the early stages. This tip can save you from a lot of unnecessary erasing later. Why press so hard when you can simply build your Jeep one shape at a time?
IMO, beginners often try to draw the final outline too quickly. That approach usually creates awkward proportions, especially around the wheels and windshield.
Instead, use simple shapes first and add detail gradually.
Step 1. Draw the Basic Car Shape
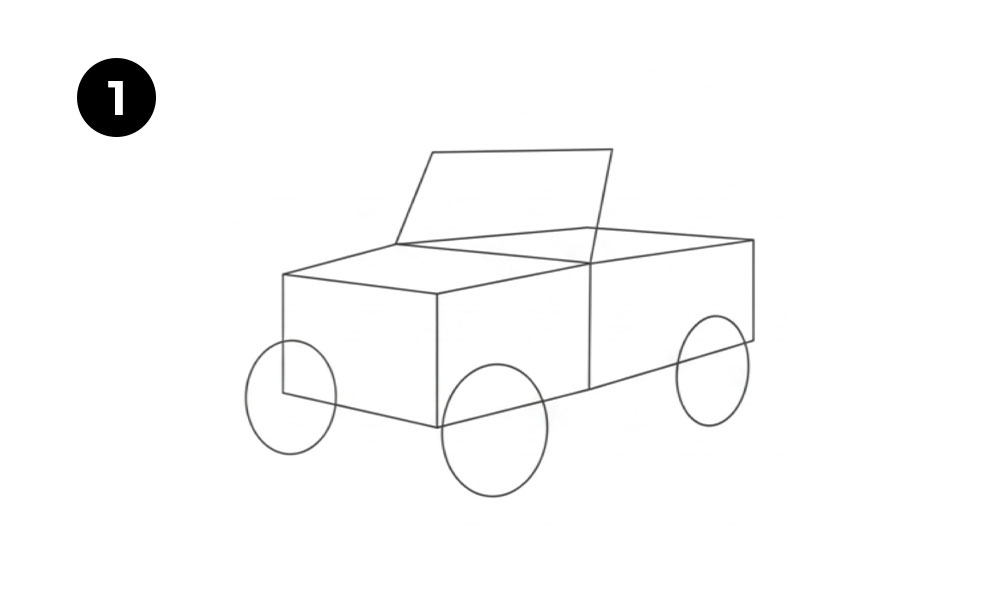
Start your how to draw a Jeep convertible car project with the main body. Don’t worry about details yet. Your goal involves creating the basic structure and overall proportions.
Sketch the Main Body
Begin with a long, slightly angled shape for the Jeep’s main body. Think of the body as a sturdy box with a hood at the front and an open section toward the back.
Use light pencil strokes to create:
- The front hood
- The main cabin area
- The rear body
- The lower frame
A Jeep has a strong, upright shape, so avoid making the body too rounded. The boxy silhouette helps create the classic rugged Jeep appearance.
Next, add the front section. Draw a slightly raised hood at the front of the vehicle. You can use simple straight and curved lines to create the basic hood shape.
Plan the Perspective
The example drawing uses a front three-quarter view. This angle lets you see the front, side, and top of the Jeep at the same time.
Why does this angle work so well? It gives the drawing more depth while keeping the shapes easy to understand.
At this stage, focus on the overall silhouette. You should see a basic vehicle shape with room for the wheels, windshield, and open roof. Keep the construction lines light and simple.
Don’t worry if your first shape looks a little strange. Every good vehicle drawing starts somewhere, and that first rough shape rarely looks like the finished Jeep. That’s kind of the point.
Step 2. Add the Convertible Details
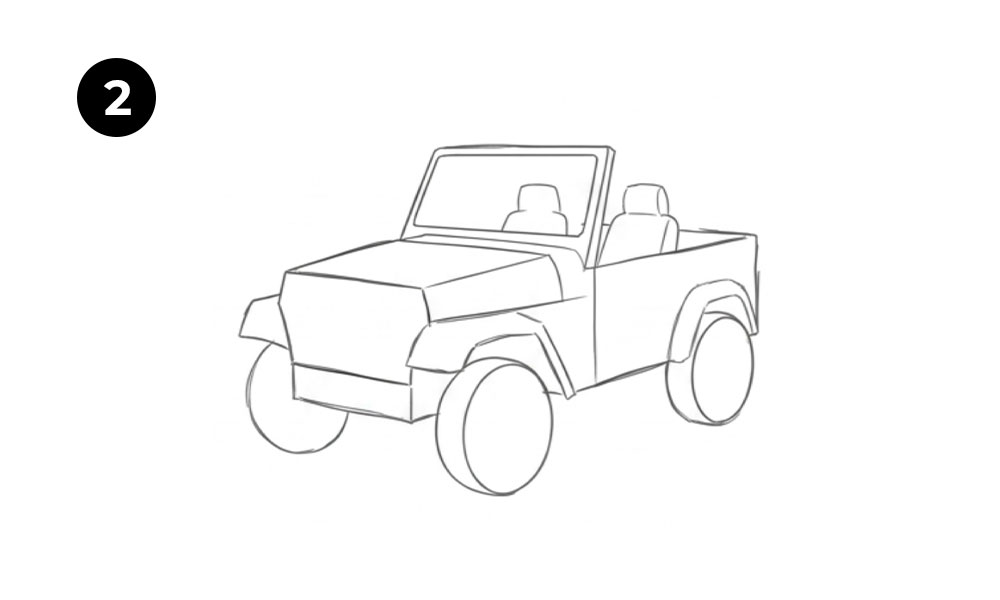
Now let’s turn that basic car shape into a Jeep convertible drawing.
The convertible design creates one of the most important features of the vehicle: the open cabin. Remove the idea of a solid roof and leave space above the seats.
Draw the Windshield
Start by adding the windshield frame near the front of the cabin. Use two slightly angled vertical lines and connect them with a top line.
The windshield should lean slightly backward. This small angle helps the Jeep look more natural and gives the vehicle a stronger sense of perspective.
Inside the windshield, leave enough space for the driver and passenger seats. You don’t need to add every interior detail yet.
Add the Open Cabin
Next, sketch the open area behind the windshield. Add the top edges of the doors and the rear section of the Jeep.
The open roof instantly gives the vehicle its convertible Jeep style. You can also add simple seat shapes inside the cabin.
At this point, your drawing should start looking like a real open-top vehicle rather than a simple box with wheels. Pretty satisfying, right?
FYI, you don’t need to draw every interior line perfectly. A few clear shapes can communicate the idea better than a crowded mess of tiny details.
Step 3. Sketch the Main Car Features
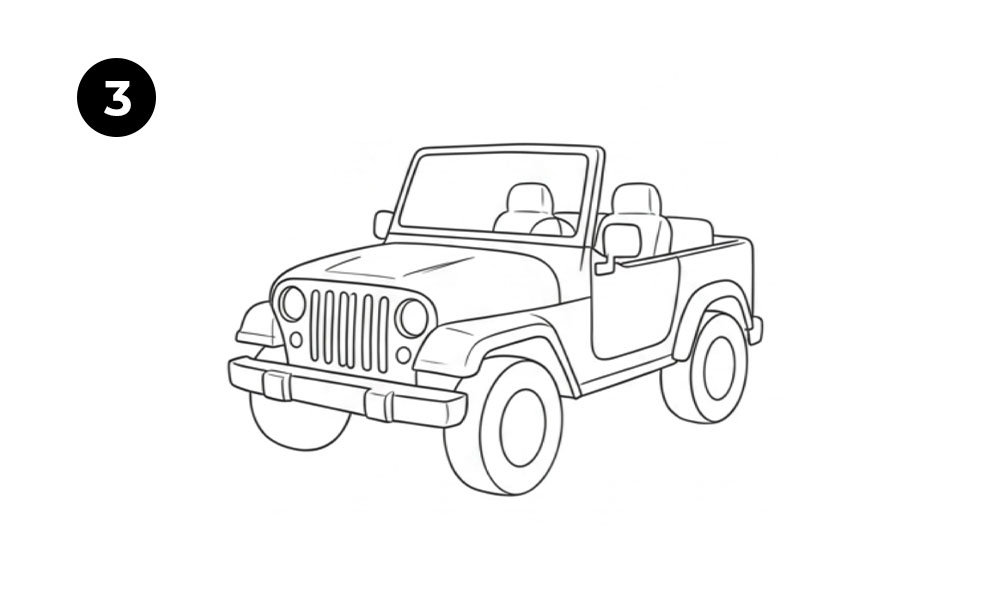
Now comes the fun part. You can start adding the features that make the Jeep recognizable.
Draw the Front Grille
The front grille gives the Jeep its bold personality. Sketch the front grille as a wide rectangular shape on the front of the vehicle.
Then add several vertical openings inside it. These lines create the familiar Jeep-inspired grille design.
The front grille acts as one of the strongest visual features in the entire drawing, so take your time with its placement.
Add round headlights on either side of the grille. Keep both headlights similar in size, but remember that perspective can make one side appear slightly different from the other.
Add the Front Bumper
Next, draw a sturdy bumper below the grille. Use thick, simple shapes to make it look strong and practical.
A Jeep doesn’t need a delicate little bumper that looks like it might fall off if someone sneezes near it. The sturdy design suits the vehicle’s adventurous personality.
Shape the Hood and Fenders
Add the hood lines and front fenders around the wheel area. Use curved lines to create the raised sections above the front wheels.
These fenders help give the Jeep a rugged look. They also separate the body from the wheels and make the vehicle easier to read visually.
At this stage, your Jeep should have:
- A recognizable front grille
- Round headlights
- A strong front bumper
- A defined hood
- Front fenders
- An open convertible cabin
Step 4. Add the Car Details
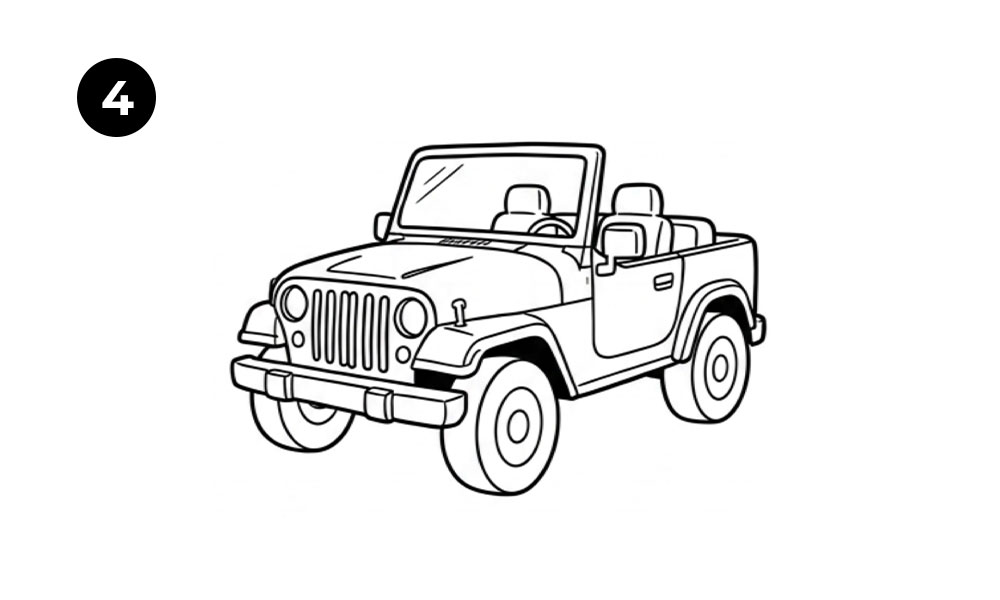
Your Jeep already looks recognizable, but small details can bring the drawing to life.
Add the Doors
Draw the side doors using the existing body shape as your guide. Add a simple door handle and outline the door edges.
Keep the door lines clean and fairly simple. Too many details can make the drawing look cluttered, especially if you create a beginner-friendly illustration.
You can also add a small side mirror near the windshield. This detail takes only a few lines but adds a lot of realism.
Add the Seats and Interior
Now return to the open cabin. Add the front seats and rear seats using simple rounded rectangular shapes.
You can draw:
- Headrests
- Seat backs
- A steering wheel
- A dashboard
- A rear seat
Simple interior details create depth without making the drawing overly complicated.
Next, add a few lines to the windshield to suggest reflections. A couple of diagonal strokes can make the glass feel more realistic.
Add the Side Details
You can also add small features such as:
- A door handle
- A side mirror
- Fender lines
- A small logo or badge
- Body panel lines
At this point, step back from your drawing and look at the overall shape. Does the Jeep still look balanced? Do the wheels sit at the same general height? Does the cabin look large enough?
If something looks off, now gives you the perfect time to adjust it. Trust me, fixing a small proportion problem now feels much easier than discovering it after you finish the entire outline. :/
Step 5. Add the Wheels and Fine Details
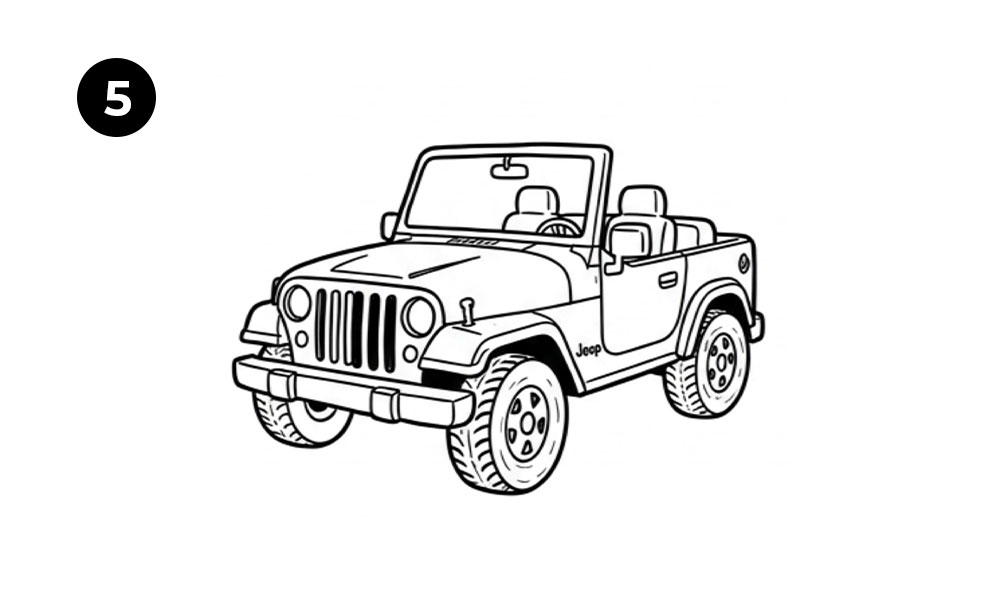
Now let’s give your Jeep the part that makes it ready for adventure: the wheels.
Draw the Wheels
Start with large circular shapes for the front and rear wheels. Because you draw the Jeep from an angle, the wheels may appear slightly oval rather than perfectly circular.
Large wheels help create the strong, off-road appearance of a Jeep.
Add the inner wheel rims and smaller circular details inside each tire. You can also draw simple spoke patterns.
Try to keep the wheels similar in size. Uneven wheels can make the vehicle look like it accidentally drove through a cartoon time warp.
Add the Tire Tread
If you want a more detailed Jeep drawing, add short angled lines around the tire edges to suggest tread.
You don’t need to draw every single tread pattern. A few bold marks can communicate the texture effectively.
For a simpler beginner drawing, you can skip the detailed tread and use a clean tire outline instead. Which option works better? Choose the level of detail that matches your skill and patience.
Clean Up the Sketch
Now carefully erase unnecessary construction lines. Keep the important outlines and remove the rough shapes that helped you build the drawing.
Look for:
- Extra body lines
- Overlapping construction shapes
- Uneven wheel marks
- Messy interior lines
Take your time during this stage. A clean outline can make a huge difference in the final appearance of your Jeep convertible car drawing.
Step 6. Complete and Give the Color
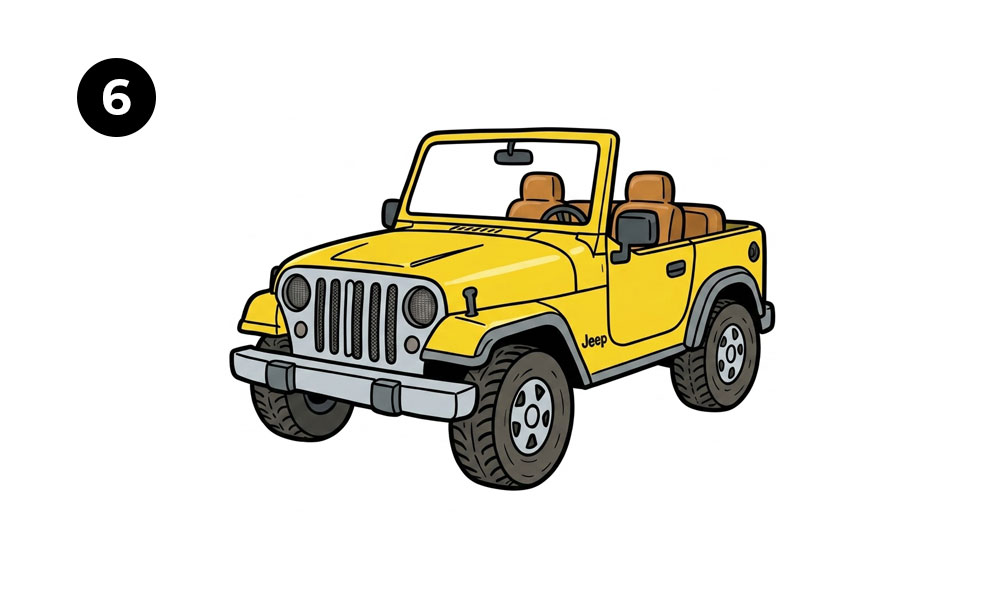
You’ve reached the final step. Now you can complete your Jeep and add color.
Strengthen the Final Outline
Use a black pen, marker, or darker pencil to trace the main lines of the vehicle.
Focus on the:
- Outer body
- Wheels
- Windshield
- Grille
- Headlights
- Doors
- Fenders
Use slightly thicker lines around the outside of the Jeep and thinner lines for smaller interior details. Line weight can add depth and make your drawing look more polished.
After you finish outlining, let the ink dry if you use a pen. Then erase any remaining pencil marks.
Add Color to Your Jeep
Now choose your favorite colors. Traditional Jeep-style colors can include green, black, gray, white, red, or classic blue.
You can color:
- The body with a bold vehicle color
- The tires with black or dark gray
- The windows with blue-gray tones
- The grille with dark gray or black
- The headlights with pale yellow or light gray
Want to create something more imaginative? Go for it. A bright orange convertible Jeep can look just as fun as a realistic green one.
Personally, I like using darker colors for the tires and grille because those shades create a strong contrast against the lighter body. Good contrast helps the important features stand out.
Add Simple Shadows
You can also add a shadow beneath the Jeep. Draw a soft, dark shape under the tires to make the vehicle appear grounded.
This simple detail can make a surprisingly big difference. Without a shadow, the Jeep might look like it floats above the page. Unless you’re drawing a flying Jeep, that probably isn’t the goal.
Tips for Improving Your Jeep Convertible Car Drawing
Once you finish your first drawing, you can improve your technique with a few simple habits.
Start With Simple Shapes
Break the Jeep into basic forms such as:
- Rectangles for the body
- Circles or ovals for the wheels
- Trapezoids for the hood
- Simple lines for the windshield
Simple shapes make complex drawings easier to manage.
Check Your Proportions
Before you add details, compare the size of the wheels with the body. Make sure the windshield doesn’t look too tall or too short.
Ask yourself:
- Does the Jeep look balanced?
- Do the wheels match the vehicle’s size?
- Does the front grille sit in the right place?
- Does the cabin have enough space?
These quick checks can help you catch mistakes early.
Practice Different Angles
After you master this front three-quarter view, try drawing your Jeep from other angles.
You can practice:
- A side view
- A front view
- A rear view
- A three-quarter rear view
Each angle teaches you something new about perspective. The side view usually feels easier because you can focus on the profile. The front three-quarter view adds more depth but requires more attention to proportions.
Add Your Own Style
You don’t need to copy every detail from a reference image. Change the body color, add different wheels, create a custom grille, or design your own Jeep-inspired vehicle.
Your drawing should reflect your style and creativity. That matters more than creating a perfectly realistic copy.
Common Mistakes When Drawing a Jeep Convertible Car
Beginners often run into a few predictable problems. Don’t worry—almost every artist deals with them.
Making the Wheels Too Small
Large wheels help create the rugged Jeep appearance. If you draw them too small, the vehicle can look more like a compact city car.
Making the Body Too Rounded
A Jeep usually has a sturdy, boxy shape. Keep the body relatively angular and use curves mainly around the fenders and wheel areas.
Adding Too Many Details Too Early
Details can distract you from the overall structure. Always focus on the main shape first.
Once the proportions look right, add the grille, lights, seats, handles, and other details.
Final Thoughts on How to Draw a Jeep Convertible Car
Learning how to draw a Jeep convertible car becomes much easier when you break the vehicle into simple stages.
Start with the basic car shape, add the open convertible structure, build the main Jeep features, and finish with wheels, details, outlines, and color.
The six steps give you a clear path:
- Draw the Basic Car Shape
- Add the Convertible Details
- Sketch the Main Car Features
- Add the Car Details
- Add the Wheels and Fine Details
- Complete and Give the Color
Don’t expect your first attempt to look perfect. Even experienced artists adjust lines, erase shapes, and rethink proportions. The real trick involves practicing often and learning what works for your own drawing style.
So grab your pencil and try your own Jeep convertible car drawing. And if your first Jeep looks a little wonky, just call it a custom off-road design. Problem solved.